Friday, July 8, 2011

July 8th - Bountiful Harvest

After 3 1/2 long months, my vines have outgrown the 11 foot frame.

When I first started this blog at my daughter's suggestion I realized I was putting a lot of pressure on myself for this year's crop to produce. My wife, after reading several early blogs asked, "What are you going to do if you have a crop failure?" As a result of this question I have worked extremely hard as to not be embaressed by all the sage advice I have been giving others about growing tomatoes.

Thank goodness my crop is about the best one I have ever had.

July 8 Harvest

In honor of William Webster Playford's first birthday today, his mother and I harvested a fine basket of delta tomatoes.

Prudence Purple on the vine


Brandyboy


Most prolific Dona
Dona

Green Porterhouse at the six foot level

Friday, June 24, 2011

EXOTIC TOMATOES (Those not normally grown in the Delta)

All of the exotic tomato plants have now produced a ripe tomato except for Mariana's Peace and Hillbilly. Today I harvested these seven and I am very pleased with them. I really would like to have a taste comparison to see which ones are the most desirable. My wife and I will attempt to rate them for taste and I will report the results. Later on I plan to have a tasting party with some taste experts to get a more professional opinion. Anyway, here they are------

Bottom to top:
1.Brandy Boy largest so far weighing over 1lb.
2.Black Krim
3.Brandywine (Suddth's strain)
4.Indian Stripe
5.Pruden's Purple
6,Cherokee Purple
7.Kellog's Breakfast

That is a quarter to the right of Brandwine to give a size reference.


Brandy Boy

The beer can is a size reference most of my
friends can relate to and was used only as a
prop.

Cherokee purple and Kellogs Breakfast


Thursday, June 23, 2011

Squirrel's be gone!!!!!!

I am having an awful problem with my pesky squirrels. They have been raiding my wonderful tomato crop. I have tried everything to deter them to no avail.

My first attempt was to attract them away from the tomatoes by offering them nice juicy ripe nectarine's which our tree in the front yard was abundantly producing. The squirrels seemed to like the nectarines just as much as they liked the tomatoes. They would take one bite and leave them alone then go to the first blushing beautiful tomato and take a bite out of it.

My wife, tired of hearing me complain about the squirrels, took it upon herself to research the problem and found a commercial product named CritterRidder and gave it to me as a father's day gift. It's main ingredient is pepper oil. I spread it around as directed. The squirrels continued their attack. They obviously like a little pepper on their tomatoes.

I am growing a small plot of Silver Queen corn in my old tomato bed. I thought that the squirrels would certainly prefer corn over tomatoes. So, I pulled several ears that were not going to fill out properly, shucked them and placed them in the tomato bed. It appears that the squirrels, like their host, enjoy silver queen corn with their tomatoes.

Our figs will be ripe in July and I will then try to entice the ground monkeys with them.

I think they have won the fight. All I have done is create a squirrel gourmet restaurant.

If anyone reading this has a solution, please post a comment on this blog. I will try anything to keep these squirrels from ruining perfectly good tomatoes!

Saturday, June 18, 2011

TODAY'S HARVEST

HARVEST BEGINS!!!!!


 The new tomato bed is working out just fine. The plants have reached the 8 foot level of the frame on both sides and we have been eating fresh vine ripened fruit for about a week now.


The plants are now 8' tall


Dona is most prolific

 The plants have all set fruit with Dona, Goliath and Park's Whopper all producing the first ripe tomatoes.


Black Krim

 Some of the exotics have been eaten already; however it appears that my squirrels prefer these and it is a real race to beat them to the ripe dark brown delicacies. This Black Krim was absolutely delicious and the first dark tomato harvested.

Of course the cherries were the earliest and, as always, the heaviest producers. I have been taking these to the office daily for about ten days now.

Monday, May 23, 2011

First Ripe Tomatoes

These four cherry tomatoes were picked from the vine on May 22nd. My goal has always been to have a fresh ripe tomato before June 1st and this is the first year I have accomplished that goal. Even though they are cherries, I am proud of this accomplishment. Two SunGold and two Sweet 100's. My wife and I ceremoniously salted these babies and shared the moment of tasting the first fresh tomatoes of 2011. She, of course, favored the red one, and I liked the SunGold best. We are anxiously waiting to harvest the big fellows starting next week.

Saturday, May 21, 2011

CROP LOOKS GOOD SO FAR!!!!!!!

All 20 plants are healthy and are really growing now. We have had a cool spell which has really been good for the exotics.They have now set tomatoes and have reached the fourth rung of the of the support frame. The Potato leaf varieties,(Brandywine, Brandy boy, Hillbilly, and Pruden's Purple) are late bloomers and all have set tomatoes before the high temperatures arrive. If I can now avoid diseases, we should have a real good crop this year.


Indian Stripe

Just look at the fruit set!


Park's Whopper


If all goes well we will have fresh home grown ripe tomatoes in a week to ten days.


Wednesday, May 11, 2011

TRAINING THE TOMATO PLANTS!

I only grow indeterminant tomato plants which means they will continue to grow all season long. The growing frames I have constructed are only 16' long and there are eight plants on either side of the frame. Therefore, the plants must be trained upwards so that each one will use its designated two feet on the frame. I believe that training the plants upward is by far the best method of supporting them. The only tool necessary for this process is a pair of good sharp sisors.

When the plants are about two feet tall I pinch off all of the suckers and tie the main growing stem to the first rung of the frame. Once it is secure I allow the plant to split into two or three growing stems by the time they reach the second rung of the frame. I then remove all of the suckers up to the second rung and tie the three growing stems securely to the frame at the second level.


                                               This photo shows a sucker being removed

This photo depicts a
properly trained plant
on the frame. All
suckers have been
removed and the
plant is going up
the frame with 3
strong growing
stems


ABOUT SUCKERS
A Sap Sucker is a bird akin to the woodpecker family. They get their name from sucking the sap out of trees. A Tomato sucker also sucks the energy out of the tomato plant. At the axil of the tomato leaf (where the leaf is attached to the growing stem) the plant will naturally produce a sucker. If not removed this new growth will produce a whole new growing stem and it will keep multiplying throughout the growing season. Many growers simply let the plant go and multiply as many suckers as it can. A plant left alone and not pruned of suckers will become bushy and much of the plants enegery will be used to produce new green growth instead of producing new blooms and tomatoes. The plant will become so thick that it will be difficult for it to recieve adequate ventilation and that will lead to disease. Properly pruned of suckers, the three or four main growing stems will produce a bountiful harvest of much larger fruit. The unpruned plant will probably produce more tomatoes, but, in my opinion, they will be much smaller and of inferior quality.

When the plants set the first tomatoes, I then remove all of the leaves on the stem up to the first rung. Don't worry about hurting the plant by cutting off the bottom leaves. If left on the plant they will yellow and die anyway as the season progresses.


Thursday, April 28, 2011

Young plants have had a hard life so far

One of my favorite stories told by my grandmother in order to inspire me, when I had had a particularly hard day or a run of bad luck in life, dealt with her "hard times" growing up. She would say, " You don't know how lucky you are. When I grew up we had to walk barefooted  two miles each way to and from school and it was uphill both ways." She would explain that living through adversity would make me stronger and a better person when I grew up. That story reminded me that my poor little tomato plants have had a really tough time at a very young age and  all have made it through the adversity. They have suffered through two hail storms, six inches of rain in a three day period, and high winds gusting up to 45 miles per hour and they have all survived. I am confident that this adversity will make them stronger when they grow up.

The plants are all reaching the three foot level of the frame and all have been safely secured to the first level. They are blooming prolifically and several have set small tomatoes. I am in the process of training them by removing the bottom leaves and removing all the suckers up to the first set of blooms. This training process (pruning) is important to insure that the first tomatoes to set will reach maturity and that the plant will grow upwards on the frame. I will discuss pruning more thoroughly later.

Tuesday, April 26, 2011

Support the Vines


It is amazing how big one of these little plants can get. All twenty varieties I have planted this year are indeterminate tomatoes. This means that the vines will continue to grow and produce as long as those vines are properly supported. There are as many support systems for tomatoes as there are mosquitoes in the Delta. Forget the little wire baskets that are sold in the box stores. They are not big or strong enough.

For the four cherry tomato plants I am growing this year I will use the traditional concrete wire mesh baskets. My associate, Barbara, graciously gave me the baskets which were used by her father, a well known tomato gardener in North Carrollton. The baskets are five feet tall and are stackable. The goal will be for each cherry to be supported by two baskets stacked on top of each other. The ground level basket will be steadied with two four foot stakes driven into the ground like tent pegs. Hopefully this method will result in cherry tomatoes being produced from ground level all the way to the top.

My main bed contains sixteen plants, eight on each side of a frame supported by the steel posts which are eleven feet tall. The lateral supports are sixteen foot long PVC plumbing pipes attached to the posts with eleven-inch zip ties. In the past I have had to utilize my boy scout training in knot tying to construct this structure. Technology has made all that early training redundant with the invention of zip ties. These small plastic ties are a wonderful invention. They will hold anything together and are super strong. They are not biodegradable and must be removed after use.

After the first three lateral pipes are attached, I place small bamboo training sticks at the base of each tomato to train it to grow up the frame. Each plant will have its own two foot area of the frame as it grows upward. I use sisal twine to tie the plant. Never use a slip knot and be sure that the knot does not choke the plant. I will remove the training sticks when the plants are tall enough to tie to the first rung of the frame. I remove all the suckers up to the first set of blooms and after that stage I try and let each plant have three growing stems.

Tuesday, April 19, 2011

Mulch the Tomatoes

One of the most important steps in producing a good tomato crop is mulching. It is really important and I highly recommend to all who plant tomatoes to take the time and energy to protect the tomato plants with a good mulch. In fact, I think that if you plant a tomato and mulch it properly you really don't have to do much else but water the plant to get a decent crop. This year I have used red pine bark. Other growers use pine straw, wheat straw, hay, and some just use black plastic. Any organic loose material will do- grass clippings, leaves or even gin trash. Be sure the mulch surrounds the plant and that it is loose enough not to form a seal over the ground. I try and have four to six inches of mulch cover the entire bed. The plants need to get water down to the roots and to breath which is why I don't recommend controlling the weed problem with a plastic cover.

The first and obvious benefit to mulching is weed control. Never cultivate the tomato plant. No hoeing, digging or tilling around the plant is allowed. The lateral roots are shallow and digging around the plant will only cut off its arteries and veins which take in all the moisture and nutrients in the soil. If you don't mulch to control the weeds, all your time will be spent pulling weeds

Mulch also helps control the temperature and moisture in the soil. In hot weather mulch helps to keep the soil as cool as possible. Likewise mulch will keep the soil temperature level during cold snaps (as if we get cold snaps in the Delta). On a hot day just take the temperature above ground and compare it to the temperature of the soil beneath the mulch. It will be five to ten degrees cooler under the mulch.

Disease control, to me, is the most important reason to properly mulch a tomato crop. Most diseases effecting tomatoes in the Delta are soil borne and are caused by allowing the tomato leaves to contact the soil. A good mulch prevents the soil from splashing up and hitting the leaves of the plant. If you fail to mulch, the underside of the leaves will be covered with dirt after a hard rain. The heat and humidity that follows a rain in the Delta is the perfect breeding ground for fungus which causes the dreaded blight. I will discuss organic and chemical control of fungal diseases later in this blog; however, suffice it to say, the first defense against this killer problem is a good mulch.

A good organic mulch is also beneficial to the soil. Most of the mulch will decompose during the growing season. After the plants are pulled simply till the remaining mulch into the soil. The earth worms will love it and so will your crop the next year.

NEXT--- SUPPORTING THE TOMATOES

Monday, April 11, 2011

IF IT WAS GOOD ENOUGH FOR POCAHONTAS IT'S GOOD ENOUGH FOR ME!!!

HOW I PLANT MY TOMATOES
There are many different theories about the proper method of planting tomatoes. I have tried most and have settled on a method that seems to work best for me in the Mississippi Delta. As stated previously, I believe that a good strong root system is vital for the hot humid Delta growing season. At planting time the average height of my plants is about two feet. A deep hole is a "must" to bury the long stems. Some believe my plants are too "leggy" and that a shorter, stouter plant is preferred, but I disagree.  I dig a hole at least two feet deep straight down and plant the tomato vertically. I remove all of the leaves of the plant up to the top cluster. Pulling the leaves downward to the base also skins the stalk (like peeling a banana). This is important because all that part of the stem which is underground forms lateral roots from the skinned portion of the stalk that can radiate sideways as much as six feet--- helping the plant take in water and the nutritents in the soil.

As is shown in the photograph I have added some supplements in the very bottom of each deep hole. This year I have added a heaping handfull of oak wood ashes from our fireplace, about 1/2 cup of bone meal, 1/4 cup of Epsom Salts (magnesium sulphate), a generous sprinkling of Osmocote (a time release fertilizer) and about two heaping table spoons of MiracleGrow (quick release fertilizer). I mix up the supplements and then cover the bottom with about six inches of soil so as not to burn the roots.

In the past I have also added fresh caught half-pound bass which decompose during the growing season furnishing additional nutrients. I figured that if it was good enough for Pocahontas, it would be good enough for me. I have read that some growers also add Tums or powered milk to supply calcium and pennies to supply the trace element of copper to the soil. This year my fishermen friends, Cliff Camp and Anthony Cascio,  failed me in providing the fresh bass.

Don't be afraid to skin the stalks. It will not hurt the plant which will recover very quickly after planting,

Plant the tomato all the way down in the bottom of the hole with only the last cluster of leaves above ground. I mound the plant by pushing the dirt up around the stem and then dig a trench or moat all the way around the new planting. This allows the water to pond around the plant to be directed downward to the roots. It is best to plant on a cloudy day or in the late evening. After planting water the new plant making sure that it is soaked all the way down to the roots.


NEXT-- MULCH THE TOMATO BED

Friday, April 8, 2011

Getting the New Bed Ready!

I have been busy getting the new raised bed ready to accept the plants.
I will have sixteen indeterminate varieties and four cherry varieties. The 8' x 16' bed will be separated by four large, round stepping stones placed length wise down the middle. Four 13' steel fence posts have been equally placed on each side of the bed to hold the lateral supports. The support posts are driven two feet into the ground leaving ten to eleven feet above ground. The lateral supports are made from 20' pvc plumbing pipes and are attached lengthwise with zip ties to the steel posts. This arrangement allows for 16 plants to all be supported on two separate frames. (eight on each side). The four cherries will be planted in a separate bed and supported with traditional  concrete wire mesh "tomato baskets". The bed has been tilled twice and the gin trash mixed with the soil really looks good.

In anticipation of a bumper crop which hopefully will produce tomatoes at the 10' level, I have devised a makeshift scaffolding system to allow me to tie the plants upward and to harvest the tomatoes. Two saw horses and two 2"x12"x16' treated boards are used for this purpose. The scaffold will be removed before planting and replaced as the plants grow too tall to reach from ground level.

NEXT- PLANTING THE TOMATOES

Wednesday, April 6, 2011

THIS IS WHAT A GOOD TOMATO CROP LOOKS LIKE!!!!!!

This article and picture is posted here for two reasons. It was written by my daughter when she was the Editorial/Creative Director for Chicken Soup for the Soul Magazine, published in its April 2005 addition, and is republished here with her permission. First of all it demonstrates what I consider to be an excellent tomato crop. She is standing on the scaffolding which is three feet from ground level. She is 5'4" and the plants have grown out of her reach. The second and obvious reason for this post is the extreme compliment my daughter paid to me by writing this article.

Stay tuned to more about this year's tomato patch. Getting the garden ready and planting will be next.

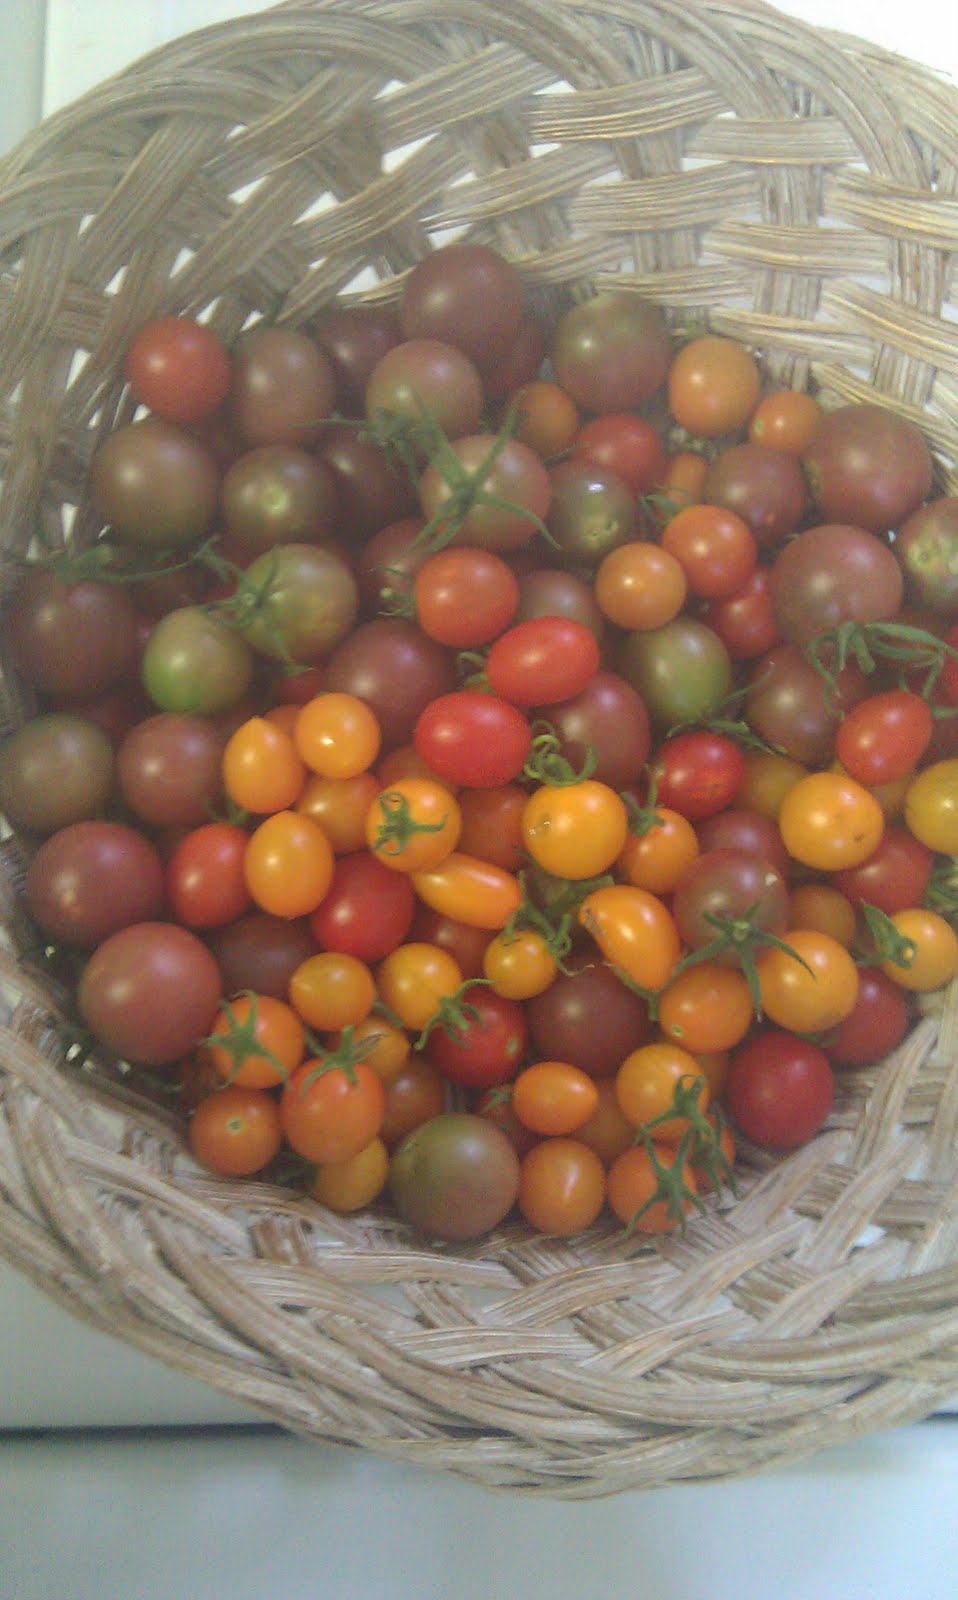
This is what a good crop looks like!

2003 Crop
A Bountiful Harvest
Stop and Smell the Tomatoes  
By Lansdale Franklin

I’m normally not a morning person, but there is an exception to this rule. From May to August, I wake up at the first chirp of the birds instead of hitting the snooze alarm, then finally stumbling to the kitchen for that first cup of coffee. And it’s all because of my obsession with tomatoes. But I’m not talking about the kind you find packaged in the little Styrofoam trays at the grocery. My fixation is for the real deal, grown in my backyard.

I’ve had a passion for this summer fruit as long as I can remember, but my total tomato fascination only started after I took a sabbatical and returned to my roots, so to speak. For six years, I lived what seemed the New York dream: great job, power lunches and financial success. But something was missing. I was homesick. So at 29 years old, I returned to Mississippi to be closer to my family.

It was not an easy transition. I was used to the anonymity of the big city. In Greenwood, everyone knew what I bought at the drug store before I made it back to my parents’ house just 10 minutes away.

Then summer came and I realized the move was exactly what I needed. Instead of starting my day with a 45-minute train ride, I joined my father every morning over a cup of coffee in the backyard to work in the famous “Franklin tomato patch.”

As a little girl, I would skip around the tomatoes each morning while Daddy checked every leaf of every plant, making sure they were dirt-free and had the perfect exposure to the sun — just as his mother and grandmother taught him. As I grew older, he put me to work. My first real job was pulling weeds, then gradually watering and fertilizing. I was proud of being able to help.

But somewhere along the line, I had forgotten about the simple pleasure of growing your own vegetables. Now, it all came rushing back. (After the caffeine took effect, of course.) This time, though, I was much more involved. My father sat in the white garden chair and explained what to do, passing down the knowledge of three generations. I dug holes, fertilized, planted the tomatoes and weeded.

As the summer heat increased and the plants grew taller, Daddy and I devised a system to keep our tomatoes reaching for the sky. We used metal fence posts and bamboo to tie and support each bloom. Once they were too tall to reach, we stole Mamma’s ladders and placed two-by-fours between the rungs to create our own version of walking the plank. I could now tie up all the plants without moving the ladder every few feet. (Please note, do not try this at home. I had the contusions to prove this was not the safest method.)

By the end of the season, our vines had grown more than 15-feet tall, and we had enough tomatoes to feed the whole town. In fact, everyone knew that if they were in need of a tomato for dinner that evening, all they had to do was come over and pick one or two or 10.

That summer, we literally grew hundreds of pounds of blue-ribbon worthy tomatoes. But that’s not what made me adore working in the garden. My bountiful harvest was the time I spent with my father, reconnecting in ways I didn’t believe were still possible. As we worked, Daddy would tell me stories about my grandmama, how he met my mother and what I was like as a child. Our relationship grew to a new level. We were now not only father and daughter but also friends.

Like all good things, our time in the tomato patch came to an end. As summer turned into fall, I realized it was time to return to the real world and get back to my career.

I now live two hours from my parents. And even though my life is incredibly busy, I still grow tomatoes. I find joy in getting up at 5:30 a.m. and checking on my own little crop –– knowing that Daddy is doing the same. I then call him on my way to work, and we compare notes. I’ve taken time to stop and smell the tomatoes, and my life is indeed richer for it.

Friday, March 18, 2011

TELL ME WHEN THE PECAN TREES BUD!


12 days after potting up
 After about two weeks in the greenhouse the plants are looking really good. The young seedlings have matured and now look like tomato plants.

My grandmother always told me to "plant tomatoes on Good Friday or when the Pecan trees bud, whichever occurs first." Since Easter is late this year and an early spring is expected I believe the Pecan trees will bud before Good Friday.

If you live in the Mississippi Delta, please keep a close eye on the Pecan trees and let me know as soon as you see them budding. Then these babies will go in the ground!

I've got to get busy and get the new bed ready for planting time.

Tuesday, March 8, 2011

239 PLANTS ALL IN POTS

ALL DONE!
CAREFULLY REMOVE SEEDLINGS
This weekend was potting-up time at River Road. We had both children and their children home for the first time in a while. Thanks to Penny, Webster, Lansdale and Burch for all their efforts in the potting-up process. We did not get much help from young Hardy as he had 2 buddies from Tunica with him.
DO NOT DISTURB ROOTS

I tried to be prepared by filling all the individual pots with MiricleGro potting soil before everyone arrived. It rained Saturday so we had to move the potting table and equipment to the side porch. Then the slow and tedious process began. On Saturday my job was to remove each individual seedling from the baking tins without damaging the roots. Webster was responsible for poking the planting hole in the new pots and planting. Penny and Burch were in charge of placing the labels which Lansdale had designed on each individual plant. The group was successful in potting eight seedlings of each of the 20 varieties in their new homes. (162 plants all together)

On Sunday Lansdale took over and helped me do it all with the rest of the seedlings. We filled pots, removed and planted seedlings and labeled the remaining 67 plants. All 239 plants are now all in their trays and in the greenhouse.

Sunday night was very cold getting down to 34 degrees. I had to appropriate Edna's electric bathroom heater to the greenhouse to warm it up a little. Thank goodness all the plants made it through the first night successfully.

PLANT SEEDLING DEEP IN POT
239 PLANTS IN GREENHOUSE


  • 

Tuesday, March 1, 2011

JUST ABOUT TIME TO "POT-UP"

March 1 Seedlings are thriving.
The seedlings are healthy and are developing their first set of true leaves. It is just about time to to transfer the seedlings from the baking tins to individual pots where they will remain until planted. This is a time consuming process and is tedious. Thank goodness my daughter, the designer for this blog, will be home for the week-end to help. I mix sand, peat moss and a little root tone to MiracleGro potting soil to fill the 4" pots. Then, each seedling is carefully extracted so as not to disturb the tender roots and planted in its individual pot. I try to get the roots all the way to the bottom of the pot so that only the leaves will be above the soil. This insures the development of a good root system for the transplanted tomato. All that portion of the stem of the plant beneath the soil will form lateral roots.

I feel it important for the plants to develop a strong root system in the pots for obvious reasons. I keep the plants in the pots longer than most tomato growers. I like the plants to be at least a foot tall when they go in the ground. In the Delta we normally have very hot weather early in the season. I try to get the plants in the garden as soon as possible so that they will bloom early and set tomatoes before it gets too hot. I have found that it is difficult for the plants to set fruit in extremely hot weather. The taller the plant when put in the garden allows it to planted deeper in the ground. The deeper it is planted, the more roots it will form to sustain the plant through our hot and humid growing season. Also, unusually cold weather at planting time may require holding the plants in the pots longer than anticipated. A good root system in the pots will sustain them until they can be safely planted outside.

I will try and post pictures of the "potting-up" process later.

Sunday, February 27, 2011

GIN TRASH- "THE ANGEL IN ANGEL HAIR PASTA"


2011 Gin Trash
Several years ago my sister-in-law, who is a "surenuff' hot-shot lawyer in Houston, Texas, questioned me about the use of gin trash in my tomato garden. Marley is partial to Mississippi Delta tomatoes and I have, in the past, shipped vine ripe fruit to her for her parties. She is very particular about what she serves and likes to demonstrate to the Texas folks the superiority of homegrown Mississippi Delta Tomatoes.

The following exchange of emails adequately explains my feelings about Gin Trash:

Me to Marley:
I have just inspected my crop and I think I can supply you enough ripe tomatoes for your party. I will have about eight by tomorrow. They are 1/4 to 1/2 lb each, and would make good slicers. I need shipping instructions. I can FedEx Thursday for delivery to your office on Friday. Let me know and I will make the arrangements.

You will be receiving good varieties: Goliath, Big Beef, Belgum Giant, Dona and Kastalia, I can ship with a cool pak and I think they will be alright. These tomatoes have been enhanced over the years with gin trash as a soil additive. Therefore these babies represent some of the finest cotton plantations in the Mississippi Delta-- Egypt, RackRent, Archerletta, Holly Grove, 4/5's, Equen, etc, etc.- Webb
Marley's reply: 
People are asking me what gin trash is.  I told them it is a euphemistic term for disgusting cotton hull sludge dredged up from the bottom of the Yazoo river!  Marley
My explanatory reply to Marley:
No, No , No!  Gin trash is the angel in angel hair pasta. It is the creme de la creme of soil additives. Certainly your friends have seen a cotton gin! They all have a long tall pipe that extends out of the gin to the backside of the gin lot. This pipe sucks up all of the trash in the gin after the cotton has been processed. It sucks up all that is left on the gin floor- cottonseed hulls, wasted fiber, and mainly the dirt from the plantations which produced the cotton. This trash is blown out of the long pipe and makes a huge mound, or pile, of gin trash on the back of every gin site. Evidently there is no other commercial use for this stuff except for eccentric tomato growers. The big pile of this stuff, which accumulates from year to year, makes huge mounds which are left out side in the open to rot, or compost. I am very particular in the "gin trash" I use as a soil additive to my crop. It must be at least three years old and relatively weed free. It must be well composted and crumbly to the touch, and it must be cost free to me. I have been very fortunate over the years to have befriended most of the managers of gins in and around Greenwood and they have allowed me to selectively choose the trash I take. My trusty friend, Boone, and I travel in my old pickup truck (inherited from my cousin. Earnest, Jr. from Inverness) with a shovel and a pitchfork to harvest this most essential additive to my garden. We have been doing this for many years. Therefore I consider my tomatoes to have a part of the whole Mississippi Delta in them. Gin trash is a specifically definable commodity, which does not come from the bottom of the Yazoo River. –Webb

Wednesday, February 23, 2011

BUILDING A RAISED TOMATO BED

My hat's off to John Doty Porter, his son, Doty and three of his excellent farm workers. They have furnished me with all the materials for my new tomato bed. The new bed is 20' x 8' and is constructed with old railroad ties from the Illinois Central Railroad. A huge flatbed truck arrived in my back yard fully loaded with the railroad ties and pulling a dump trailer fully loaded with totally composted Gin Trash pilfered from the old Morgan City Gin.

With the expertise of the Porters' and their crew the bed was completed in less than an hour. The following photos are self explanatory and demonstrate how competent this crew was in this endeavor:

Now, all I have to do is add the oak wood ashes from our fire place and till the new bed to incorporate the Gin Trash into the soil. When finished this new raised bed will be the envy of every tomato gardener on planet earth! I think I made a pretty good deal with John Doty by supplying him a few tomato plants in exchange for the work done on this new bed. Don't you?

More on Gin Trash later.

Tuesday, February 22, 2011

SEEDS HAVE SPROUTED!!!

Week 1 after planting.
Exactly one week after planting the tomato seed have begun to sprout. It looks as if we will have a very good germination rate. Most of the seed are poking through the potting mix now and I'm  hoping that we have 100%. germination this year. If so I'll have to pot up over 200 plants.

Tuesday, February 15, 2011

Cherry Tomatoes- How 16 Became 20

If you are keeping up with my progress you will note that I have actually seeded 20 different varieties. In a previous post I described in detail the 16 indeterminate varieties. I have also seeded four different cherry tomatoes. I am sort of new to Cherries. I personally like them and keep a hidden salt shaker in the garden to eat them right off the vine. My old friend, Bobby Olmsted, likes them a lot and I try and get him a bunch or two each year.

This year I will try Black Cherry, Sun Gold, Supersweet 100 and Riesentraube. Black Cherry is a large dark fruit and is really tasty. Sun Gold, like its name is golden when ripe and very sweet. These two are repeats for me and boy, are they prolific. I am trying to find a real good red cherry to go with these two must grow varieties and have been unsuccessful in the past. This year the reds will be Supersweet 100 and Riesentraube. What I am shooting for is a colorful medely of black, gold and red.

I am partial to a recipe using ripe red cherry tomatoes which we served at my daughter's wedding:

Lansdale's Wedding Tomatoes
Fresh red cherry tomatoes
Kosher salt
Vodka
Toothpicks
Harvest fresh red cherry tomatoes. Stick several holes in each tomato with a tooth pick and soak overnight in a copious amount of good vodka. Chill in ice box. Drain vodka and save for Bloody Mary's. Serve soaked tomatoes with toothpicks and Kosher salt. These appetizers will have your guests in interesting and exciting conversation in no time. For more great recipes...see my daughter's food blog: Sweet Salty and Southern.